Tuesday, June 28, 2011

What I've learned about teaching

These last few weeks have been really busy, but exciting! I was given several opportunities to teach, which actually led to my first real art job! It started with my little sis-in-law asking me to do a clay workshop for her BFF's sweet 16 party. I taught 11 teenage girls how to make textured slab mugs/cylinders. After that, I filled in teaching an adult evening class, and then filled in last minute for the kids art camp at Beech Grove with 10 7-9 year olds. All of this led to me being given the Artist in Residence position at Beech Grove. Woohoo!

In my infinite teaching experience (ie. 3 weeks worth), I've learned a few things:

1. Teenage girls will never be satisfied with anything they make. Everything they make looks terrible, but their friend's project looks sooooo great. They will start over 5 or 6 times because they think what they've done looks stupid. The workshop will take at least 3 times longer than you anticipated because of this.


 2. Speaking in front of a group of people is not nearly as scary when you're talking about something you know a lot about. Especially when it's something you kind of geek out over. I have trouble meeting people's eyes and starting conversations, but I was much more comfortable once I started talking ceramic technique.
I taught the night class how to make birds and doll jars. I'm using these guys for glaze test tiles.
 

3. When you don't know what to do, quote and copy people you thought were great teachers. If something they said or did stuck with you, it's probably worth passing on.

4. In a class full of kids, you will have one kid who will finish in 5 minutes, will insist that their project is perfect as is, and will ask you "What do I do now?" repeatedly until you find something for them to do. (In our class, there were 2 of them.)

5. Kids like being helpers. Put that kid who finished in 5 minutes to work! We had kids helping prep the next project, wiping down tables, and helping other kids with their projects.

6. You will also have one kid who is so meticulous, they will take twice as long as everyone else, possibly painting one tiny section of their project for ages before moving on. Don't stress over it - just let them work at their own pace.

7. Have extra projects prepared! As previously stated, teaching a project never takes the amount of time you planned it to.


They made A LOT of stuff in a week!
8. Making mistakes is ok, because that's how you get better, as long as you learn from them. Don't freak out when things don't go according to plan. Treat every new day like a puzzle to solve, or an experiment. That makes it exciting!

9. If you're excited about what you're teaching, it shows. Show them things you think are cool! At the same time, don't get bummed if they don't always think what you're doing is as cool as you do. You can't please everyone.


10. You may feel like you're not ready to teach, but if you're given the opportunity, jump in with both feet anyway. Don't be afraid. If you think about it, you'll realize that you have experiences you can share with other people, and things you've learned that you can pass on, even if you're not a master at what you do. Just remember what you've learned so far, and share it.


I'm really looking forward to teaching on a regular basis, and hopefully doing another kids class soon as well. I think it's going to push me to try new techniques, so that I have a greater variety of things to teach. Hopefully I'll become a better artist because of it, and a better teacher as well.

Tuesday, June 14, 2011

My first clay workshop!

My little sis in law, Lillie Joy, had her BFF in town staying with us for the week, and she threw her a sweet 16 party while she was here. She saw the slab built mug my Dad made at the studio while he was in town, and asked me if I'd be willing to teach the girls at the party how to make their own mugs. I've never done any teaching before, but I've always wanted to, so I jumped at the chance.


Rachel Bleil taught us how to make these mugs at BGCW, and I thought it was a perfect project for the teens. They took rolled out slabs and decorated them with texture from a pile of materials we put together, and then rolled them into cylinders and put bottoms and handles on them. Lillie and Abbie had fun looking around the house for things that would make a cool texture in the clay, and I also brought some stamps, doilies, and press molds from the studio. I'm going to bisque them and glaze them with pink and blue glaze, which were the colors chosen by the birthday girl.

Wish these mugs luck! I hope they turn out ok. In any case, the girls all had fun, and I got my first teaching experience. I'm thinking of suggesting some mini teen workshops like this at the studio, maybe next summer? Or maybe even this one, if we could pull it together soon.

I'll post pics of the finished projects!

Monday, June 13, 2011

Pesto and pestles

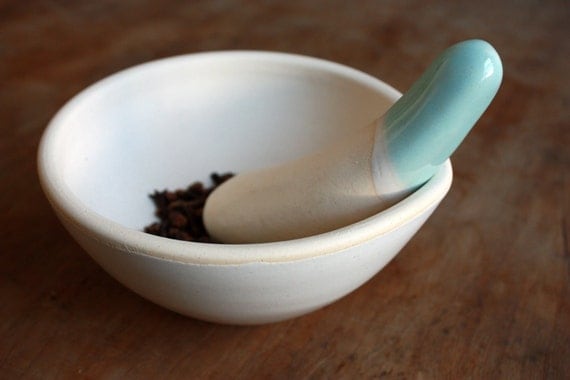
Mortar and Pestle Set by clamlab
I saw this lovely mortar and pestle set on Etsy a few weeks back, and I got all excited because it's made out of porcelain on the wheel. I thought "Yay! I can make that!" I've been wanting a little mortar and pestle for the kitchen, but I never thought of making my own. I also wanted one for grinding glaze materials at the studio.

Around the same time, I saw a pesto recipe in Traditional Home magazine that calls for a mortar and pestle, and I've never made pesto by hand before. I love pesto! So I decided I had to do this.

I decided that the green one was coming home to the kitchen, and the little blue one could be my studio set.
We normally have pizza on Sundays, and my husband just got a brand new bread machine for $5 at a moving sale, so I thought we should try making our own pizza dough, and I could put pesto on it. I can't have dairy right now because baby Maddy can't digest it, so I made my half of the pizza without cheese.
Best pizza ever!!! I didn't miss the cheese at all. The crust was nice and crispy, and the olive oil soaked in and make it taste like good bread. Nich had chicken alfredo pizza, and mine was chicken with tomatoes, portabella mushrooms, and calamata olives.


Making pesto by hand with the mortar and pestle was definitely labor intensive, but man was it good! I've now decided I need to grow some basil so I can have fresh pesto whenever I want.

The pizza dough recipe I used is on allrecipes. You can find it here.

The aromatic herb pesto recipe is as follows:
Aromatic Herb Pesto:
In mortar, place pinch of coarse sea salt and five basil leaves. Crush with pestle. Add, a few at a time, about 25 fresh basil leaves, 1/2 cup parsley, 8 mint and 2 sage leaves, and 2 garlic cloves, crushing after each addition and pounding until mixture becomes a paste. Add 3 tablespoons toasted pine nuts; work into paste. Add 2 tablespoons shredded Grana Padano cheese. Slowly pour in 1/2 cup extra-virgin olive oil. Work all into creamy consistency. (If using blender, add salt, basil, parsley, mint, sage, and garlic to blender. Cover; blend to make paste. Add pine nuts. With motor running, slowly pour half the olive oil through opening in lid. Add Grana Padano cheese and remaining olive oil. Cover; blend until mixture becomes creamy paste.) You can also spread pesto on grilled Italian bread or use it as a condiment for beef and chicken.

I'm really pleased with the way my sets came out. They're not quite as elegant as the ones on Etsy, but they're pretty cute. I'm debating whether to make more or not. What do you think?